")
The ContentDrips API is a powerful tool for automating the creation of visually appealing carousels and single-image graphics, perfect for social media platforms like LinkedIn, Instagram, or Twitter. In a previous blog post, we covered how to set up the ContentDrips API and how it works.
In this post, we’ll dive into the specifics of preparing your carousel or graphic template to work seamlessly with the API, ensuring professional and dynamic outputs.
We’ll also explore advanced features, provide code examples, and share practical use cases to help you maximize the API’s potential.
Step 1: Understanding the Template ID
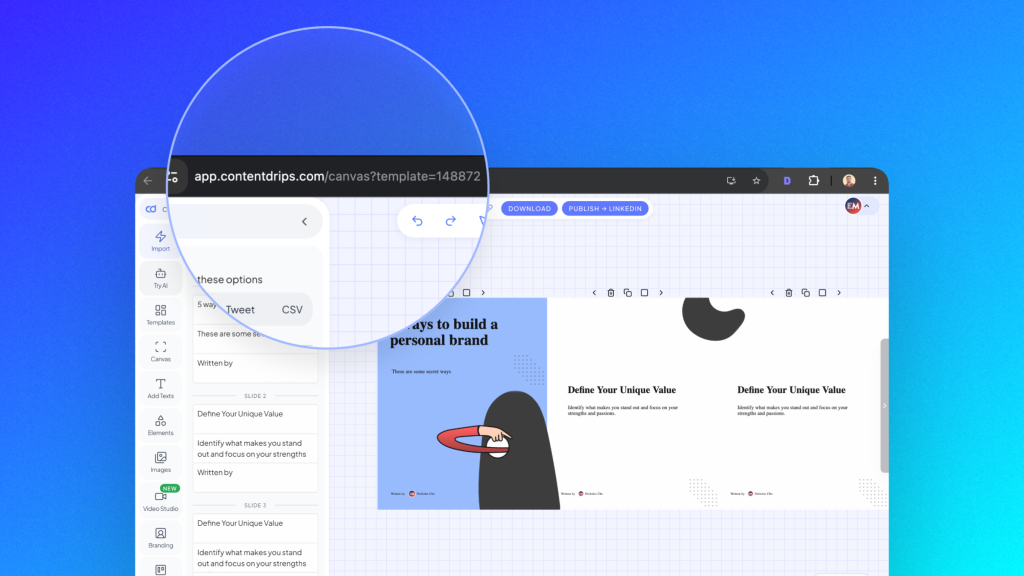
To get started with the ContentDrips API, you need a Template ID. This unique identifier links your API call to a specific template in ContentDrips. To find it:
- Open your desired template in the ContentDrips editor.
- Check the URL in your browser. It will look something like this:
https://app.contentdrips.com/canvas?template=148872
The number148872is your Template ID.
This ID is critical as it tells the API which template to use for rendering your carousel or graphic. Whether you’re creating a multi-slide carousel or a single quote graphic, the Template ID is the starting point.
Step 2: Preparing Your Carousel Template
Carousels are a fantastic way to share engaging, multi-slide content on platforms like LinkedIn or Instagram. To prepare a carousel template for the ContentDrips API, follow these steps:
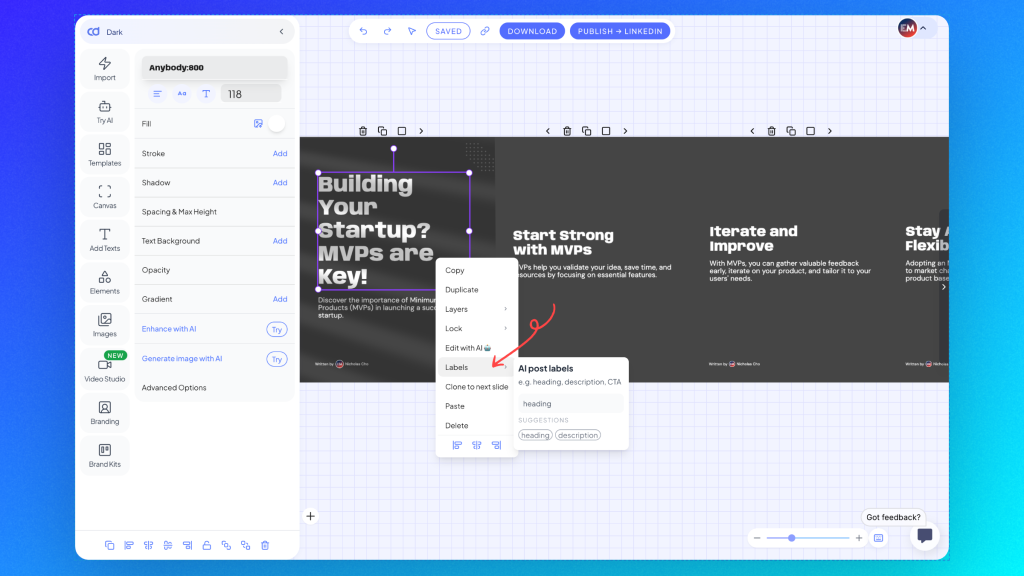
Adding and Labeling Textboxes
Each slide in your carousel can include a heading, description, or both, along with an optional image. At least one textbox is required per slide. Here’s how to set it up:
- Add Textboxes: In the ContentDrips editor, add textboxes to each slide for the heading and/or description.
- Label Textboxes: Right-click on a textbox, hover over the Label option, and assign a label such as
headingordescription. This labeling is crucial as it allows the API to map your data to the correct text fields.- Example: Label one textbox as
headingfor the slide title and another asdescriptionfor the body text.
- Example: Label one textbox as
- Add Images: If your slide includes an image, label it as
imagein the editor. This ensures the API can replace it with your specified image URL.
Setting Max Height for Textboxes
To ensure your text fits perfectly without overflowing, you can set a max height for each textbox:
- Select the textbox in the editor.
- Navigate to the Spacing and Max Height option in the left menu.
- Set a maximum height. If the text exceeds this height, ContentDrips will automatically reduce the font size to fit, maintaining a clean and professional look.

This feature is especially useful for dynamic content where text length varies, such as user-generated quotes or product descriptions.
Using Auto-Layout for Text
ContentDrips offers an auto-layout text feature to prevent overlapping textboxes. If two textboxes are vertically close and one contains lengthy content, the API will automatically adjust the position of the other textbox to avoid overlap. This ensures your design remains visually appealing, even with varying content lengths.
Using Image Frames
We also have support for clipped images even in our API too. Simply create a clipped image by first creating a shape or any SVG element object. Select that object, see the left side bar you will see an image icon in the Fill option. Click on it, upload image or choose image and that’s it.
Now you can right click on it and add your label to it.
Saving Your Template
Once you’ve added and labeled your textboxes and images, and configured any advanced settings like max height, save your template in the ContentDrips editor. It’s now ready for use with the API.
Step 3: Making the API Call for Carousels
To generate a carousel, you’ll use the ContentDrips API endpoint with the carousel-maker tool. Below is a sample API call to render a carousel:
const response = await fetch("https://generate.contentdrips.com/render?tool=carousel-maker", {
method: "POST",
headers: {
"Content-Type": "application/json",
Authorization: "Bearer YOUR_API_KEY"
},
body: JSON.stringify({
template_id: "148872",
output: "png",
carousel: {
intro_slide: {
heading: "Welcome to Our Brand",
description: "Discover how we create value for our customers.",
image: "https://example.com/intro-image.png"
},
slides: [
{
heading: "Slide 1: Our Mission",
description: "Empowering businesses with innovative solutions.",
image: "https://example.com/slide1-image.png"
},
{
heading: "Slide 2: Our Vision",
description: "Building a future where technology drives success.",
image: "https://example.com/slide2-image.png"
}
],
ending_slide: {
heading: "Join Us Today",
description: "Let’s create something amazing together!",
image: "https://example.com/ending-image.png"
}
}
})
});
If you use n8n you can also use our node. You can find it here.
Explanation of the Code
- Endpoint:
https://generate.contentdrips.com/render?tool=carousel-makerspecifies that you’re rendering a carousel. - Headers: Include your API key in the
Authorizationheader. Learn how to get your API key in our previous blog post. - Body: The
template_idlinks to your template,outputspecifies the format (pngorpdf), and thecarouselobject contains the content for the intro slide, main slides, and ending slide. - Output Formats: Use
pngfor image-based carousels (ideal for Instagram) orpdffor LinkedIn carousels.
Step 4: Preparing a Single-Image Graphic Template
For single-image graphics, such as quote posts or promotional banners, you’ll use the same ContentDrips API but without the ?tool=carousel-maker parameter. Here’s how to prepare your template:
- Add and Label Elements: Add textboxes or images to your template and label them appropriately. For example, for a quote graphic, label one textbox as
quoteand another asauthor. For an image, label it asimage. - Use Content Updates: To dynamically update text or images, use the
content_updatearray in your API payload.
Here’s a sample API call for a single-image graphic:
const response = await fetch("https://generate.contentdrips.com/render", {
method: "POST",
headers: {
"Content-Type": "application/json",
Authorization: "Bearer YOUR_API_KEY"
},
body: JSON.stringify({
template_id: "148873",
output: "png",
content_update: [
{
type: "textbox",
label: "quote",
value: "The only limit to our realization of tomorrow is our doubts of today."
},
{
type: "textbox",
label: "author",
value: "Franklin D. Roosevelt"
},
{
type: "image",
label: "background",
value: "https://example.com/background-image.png"
}
]
})
});
Explanation of the Code
- Endpoint:
https://generate.contentdrips.com/renderis used for single-image graphics. - Content Update: The
content_updatearray allows you to dynamically update labeled textboxes or images. Specify thetype(textboxorimage), thelabelyou assigned in the editor, and the newvalue(text or image URL).
Step 5: Advanced Customization with Custom Labels
Beyond heading, description, and image, you can assign custom labels to textboxes or images for more flexibility. For example, if your template includes a hashtag or a call-to-action button, label it as hashtag or cta. Then, update it in the API payload:
content_update: [
{
type: "textbox",
label: "hashtag",
value: "#Branding #SocialMedia"
},
{
type: "image",
label: "cta",
value: "https://example.com/cta-button.png"
}
]
This feature is ideal for automating dynamic content like hashtags, social media handles, or branded images.
Use Cases for the ContentDrips API
The ContentDrips API is versatile and can be used for a variety of automation tasks. Here are some practical use cases:
- Social Media Automation:
- Generate daily inspirational quote graphics for Instagram or Twitter by updating the
quoteandauthorfields. - Create LinkedIn carousels to share industry insights, with each slide dynamically populated from a database of tips or statistics.
- Generate daily inspirational quote graphics for Instagram or Twitter by updating the
- Marketing Campaigns:
- Automate promotional banners for e-commerce products by updating product images, prices, and descriptions.
- Generate personalized event invitations with custom names and event details.
- Educational Content:
- Create multi-slide carousels for online courses, with each slide summarizing a lesson or key takeaway.
- Produce branded study guides in PDF format for LinkedIn sharing.
- Branding and Consistency:
- Use a single template to generate consistent graphics for multiple social media platforms, ensuring brand alignment.
- Automate hashtag or watermark updates across all visuals.
- Dynamic Reporting:
- Generate visual reports or dashboards as PNGs or PDFs, pulling data from APIs or databases to populate charts or text fields.
Tips for Success
- Test Your Templates: Before automating, test your template with sample API calls to ensure labels and layouts work as expected.
- Optimize Image URLs: Ensure all image URLs in your API payload are publicly accessible and in a supported format (e.g., PNG, JPEG).
- Leverage Auto-Layout: Use the auto-layout feature to handle dynamic text lengths, especially for carousels with varying content.
- Secure Your API Key: Store your API key securely and avoid hardcoding it in client-side code. Refer to our API setup guide for best practices.
Conclusion
The ContentDrips API makes it easy to automate the creation of professional carousels and single-image graphics, saving you time while maintaining high-quality, branded visuals.
By carefully preparing your templates, labeling textboxes and images, setting max heights, and leveraging features like auto-layout—you can create dynamic, scalable content for any platform.
Whether you’re a marketer, content creator, or developer, the ContentDrips API empowers you to streamline your workflow and focus on what matters most: engaging your audience.
Ready to get started? Grab your API key and dive into our setup guide to begin automating your content creation today!


